Signs have the power to draw people in and instantly speak for your business. A thoughtfully created custom sign adds personality and helps customers connect with your brand right away. Everyone notices when a sign looks sharp and professional.
The complete process of custom signage moves smoothly from the first conversation all the way to final care. It begins with detailed planning and consultation. Then comes creative design, followed by smart material choices. Engineering and prototyping ensure safety. After that fabrication turns ideas into reality. Permitting keeps everything legal. Professional installation places the sign perfectly. Finally post-installation support and maintenance protect your investment. This clear journey delivers a beautiful, durable sign that works hard for your business every single day.
What Are the Steps in Creating Custom Signage?
Creating personalized signage follows a clear path that brings ideas to life successfully. Each step builds on the last one. This structured approach saves time and money while delivering excellent results that match your vision perfectly.
1. Initial Consultation & Planning
This first meeting with a signage company sets the foundation for your entire personalized signage project. The experts listen carefully to understand what you want to achieve.
They ask about your brand message and target audience during the talk. Site visits help assess lighting conditions and space limits. Timelines and budget details come up early too. Clear notes from this stage prevent misunderstandings down the road. Good planning here makes every later step smoother and more efficient.
2. Conceptualization & Design
Ideas start taking shape once planning finishes. Designers create several concepts for your custom signage that reflect your brand personality.
Sketches and digital mockups show different styles and layouts clearly. Feedback rounds let you suggest changes easily. Colors, fonts and images get refined together. The goal is a design that stands out yet stays simple to read from a distance. Strong concepts ensure the final sign feels unique and effective.
3. Material Selection & Specifications
The right materials make a big difference in how long your sign lasts outdoors or indoors. Options include aluminum, acrylic vinyl and more durable choices.
Experts from your selected signage company near me consider weather exposure, UV protection and color fading risks carefully. Thickness and finish details get specified for best performance. Budget and maintenance needs influence decisions here as well. Proper specifications prevent future repairs and keep the sign looking fresh for many years.
4. Engineering and Prototyping
Engineering reviews confirm the sign can handle wind loads and structural demands safely. Calculations check balance and attachment points thoroughly.
Prototypes help test the design in real conditions before full production begins. Digital models or small physical versions show any issues early. Adjustments happen quickly at this stage. This careful testing avoids problems during installation and ensures the sign meets safety standards completely.
5. Fabrication & Production
Actual building starts after all approvals. Skilled teams cut shapes and assemble parts with precision tools.
Printing or routing adds graphics and lettering accurately. Illumination options like LEDs get wired if needed for night visibility. Quality checks happen at multiple points to catch any flaws. Careful production delivers a sign that matches the approved design exactly and looks polished.
6. Permitting and Compliance
Local rules must be satisfied before installation can happen. Professionals prepare detailed drawings and submit permit applications on your behalf.
They handle zoning requirements, ADA standards and electrical codes smoothly. Approval times vary by location but early preparation speeds things up. Compliance checks prevent legal issues or forced changes later. Expert help here removes headaches and keeps the project on schedule.
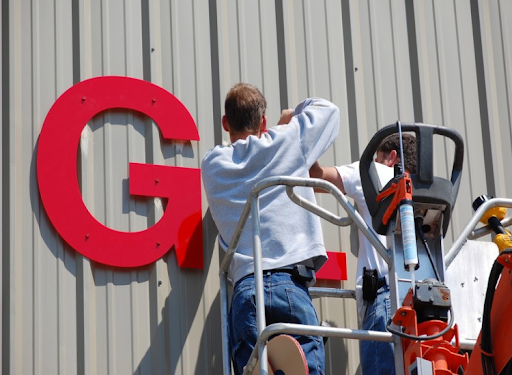
7. Installation
Professional crews prepare the site before bringing the sign over. They check measurements and electrical connections one last time.
Safe lifting and mounting methods ensure the sign sits straight and secure. Final adjustments make it look perfect in its environment. Cleanup follows so your location stays neat. Proper installation guarantees the sign performs well and attracts attention as planned from day one.
8. Post‑Installation & Maintenance
Handover includes clear instructions on basic care for your new sign. Warranties provide added confidence against manufacturing defects.
Regular cleaning schedules help maintain bright colors and sharp details. Repair services stay available if weather or accidents cause damage. Ongoing support answers questions quickly whenever needed. Good maintenance extends the life of your investment and keeps the sign working effectively for a long time.
Conclusion
The entire process of creating custom signage flows smoothly through eight important steps. It begins with careful consultation and planning. Conceptualization and design turn ideas into visuals. Material selection and specifications add strength and beauty. Engineering and prototyping test the design for safety. Fabrication and production create the actual sign with precision. Permitting and compliance handle all legal requirements. Expert installation completes the setup beautifully.
Post-installation and maintenance protect your investment over time. Every stage matters and connects with the next. When you follow this full journey, you end up with signage that looks professional and performs perfectly. It becomes a lasting asset that helps your business grow every single day.